5. Subnet Creation
UPDATE: The Ash Console open beta has ended. Looking to launch your Avalanche L1? See our latest Ash Managed L1s offer announcement!
In this section, we will create a Subnet resource on our local network.
Control key creation
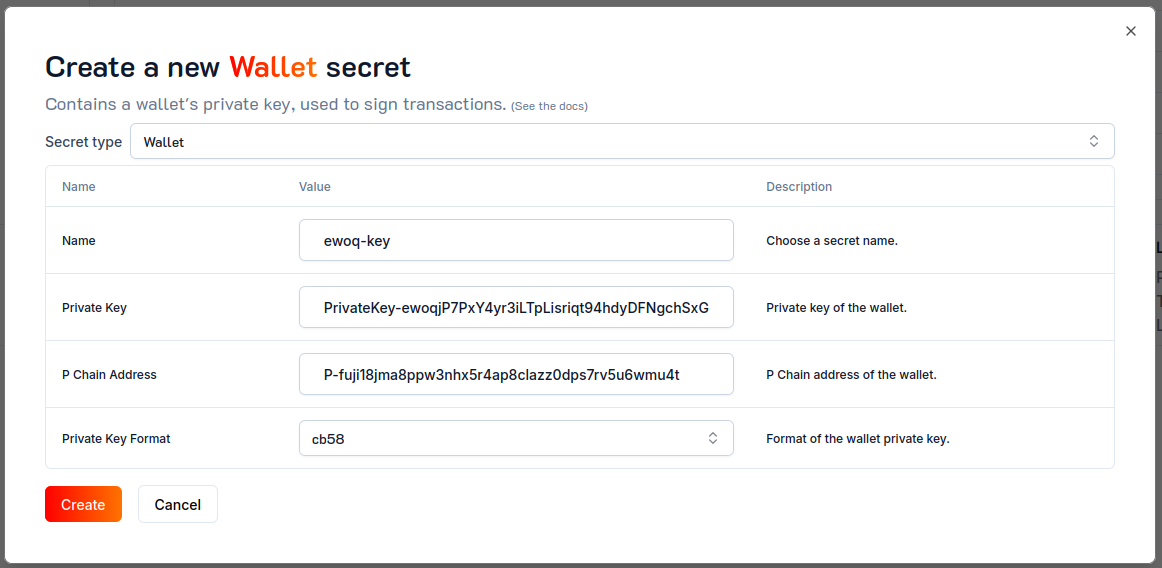
Before creating a Subnet, we need to create a wallet secret. This wallet will be use to sign the Subnet transactions (creation, validator management, etc.) and the P-Chain address will be used as the control key of the Subnet.
To make things easier, we will use the ewoq address which is pre-funded on the local network.
- Using the Ash Console
- Using the Ash CLI
From the Ash Console project overview page, navigate to the Secrets tab:
- Click on the
Create Secretbutton. - Select the
Walletsecret type. - Set
ewoq-keya name for your secret. - Copy-paste the
ewoqkey in thePrivate Keyfield:PrivateKey-ewoqjP7PxY4yr3iLTpLisriqt94hdyDFNgchSxGGztUrTXtNN - Copy-paste the
ewoqaddress in theP-Chain Addressfield:P-fuji18jma8ppw3nhx5r4ap8clazz0dps7rv5u6wmu4t - Choose
cb58in thePrivate Key Formatfield. - Click on the
Createbutton to add secret to the project.

ash console secret create '{
  name: ewoq-key,
  secretType: wallet,
  pChainAddress: P-fuji18jma8ppw3nhx5r4ap8clazz0dps7rv5u6wmu4t,
  privateKey: PrivateKey-ewoqjP7PxY4yr3iLTpLisriqt94hdyDFNgchSxGGztUrTXtNN,
  privateKeyFormat: cb58
}'
Secret created successfully!
+-------------+-------------+--------+------------------+---------+
| Secret name | Secret ID   | Type   | Created at       | Used by |
+=============+=============+========+==================+=========+
| ewoq-key    | 657b...949e | Wallet | 2024-01-30T13:40 | 0       |
+-------------+-------------+--------+------------------+---------+
Do not use this wallet as control key in production!
Subnet creation
- Using the Ash Console
- Using the Ash CLI
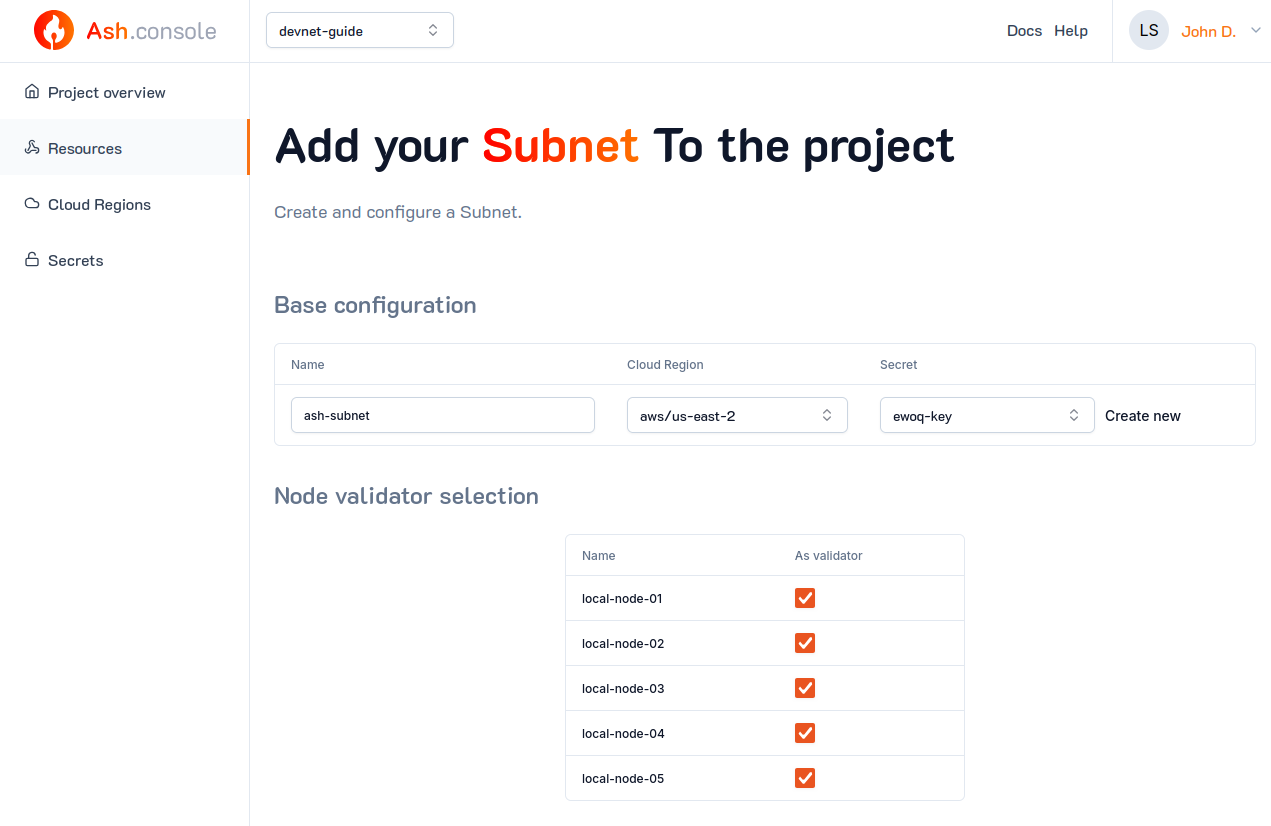
From the Ash Console project overview page, navigate to the Ressources tab:
- Click on the
Subnetstab. - Click on the
Create Subnetbutton. - Pick a name for your Subnet, e.g.,
ash-subnet. - Select the cloud region you added in the previous step.
- Select the
ewoq-keysecret you created in the previous step. - (Optional) Configure the Subnet with custom configurations if needed. See the ash.avalanche.subnet reference doc for a list of all supported configuration keys.
- Click on the
Createbutton.
Make sure that all local-node-0x nodes are checked as Subnet validators.

The following command will create a Subnet EVM blockchain with a standard genesis configuration.
ash console resource create '{
  name: ash-subnet,
  resourceType: avalancheSubnet,
  cloudRegionId: aws/us-east-1,
  subnetControlKeySecretId: ewoq-key,
  subnetNodesResourceIds: [
    local-node-01,
    local-node-02,
    local-node-03,
    local-node-04,
    local-node-05,
  ],
  subnetConfig: {
    avalancheSubnetConfig: {
      subnet_blockchains_list: [
          {
            name: AshLocalEVM,
            vm: subnet-evm,
            genesis_data: {
              "config": {
                "chainId": 66666,
                "homesteadBlock": 0,
                "eip150Block": 0,
                "eip150Hash": "0x2086799aeebeae135c246c65021c82b4e15a2c451340993aacfd2751886514f0",
                "eip155Block": 0,
                "eip158Block": 0,
                "byzantiumBlock": 0,
                "constantinopleBlock": 0,
                "petersburgBlock": 0,
                "istanbulBlock": 0,
                "muirGlacierBlock": 0,
                "subnetEVMTimestamp": 0,
                "feeConfig": {
                  "gasLimit": 8000000,
                  "minBaseFee": 25000000000,
                  "targetGas": 15000000,
                  "baseFeeChangeDenominator": 36,
                  "minBlockGasCost": 0,
                  "maxBlockGasCost": 1000000,
                  "targetBlockRate": 2,
                  "blockGasCostStep": 200000
                }
              },
              "alloc": {
                "8db97C7cEcE249c2b98bDC0226Cc4C2A57BF52FC": {
                  "balance": "0x295BE96E64066972000000"
                }
              },
              "nonce": "0x0",
              "timestamp": "0x0",
              "extraData": "0x00",
              "gasLimit": "0x7A1200",
              "difficulty": "0x0",
              "mixHash": "0x0000000000000000000000000000000000000000000000000000000000000000",
              "coinbase": "0x0000000000000000000000000000000000000000",
              "number": "0x0",
              "gasUsed": "0x0",
              "parentHash": "0x0000000000000000000000000000000000000000000000000000000000000000"
          }
        }
      ]
    }
  },
}'
The avalancheSubnetConfig field is following the same structure as the Ansible Avalanche Collection's ash.avalanche_subnet role. See Blockchain configuration for more information on how to generate a custom genesis configuration.
Resource successfully created in project 'ash-devnet'!
+---------------+-------------+-----------------+---------------+-------+------------------+---------+-------------------+
| Resource name | Resource ID | Type            | Cloud region  | Size  | Created at       | Status  | Resource specific |
+===============+=============+=================+===============+=======+==================+=========+===================+
| ash-subnet    | 542c...f94e | AvalancheSubnet | aws/us-east-1 | Small | 2024-01-30T13:58 | Pending |  ID         |     |
|               |             |                 |               |       |                  |         |  Validators | 0   |
+---------------+-------------+-----------------+---------------+-------+------------------+---------+-------------------+
Unlike the avalancheNode resource, there is no concept of size for the avalancheSubnet resource. The Ash Console will create a small instance (e.g.: t2.small) that will serve as the Subnet control plane.
Subnet information
- Using the Ash Console
- Using the Ash CLI
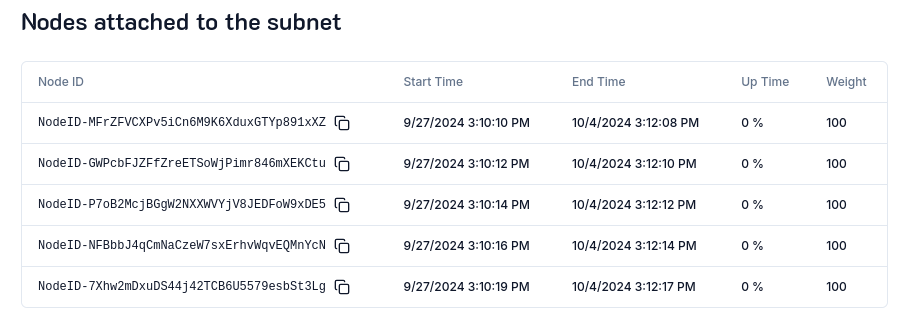
After a few minutes, we can get the Subnet ID and attached nodes:

Notice that upon Subnet creation, the nodes' *uptime is 0%. This is because the Avalanche nodes' configuration has been updated to track the Subnet but they have not been restarted so it has not been taken into account yet.
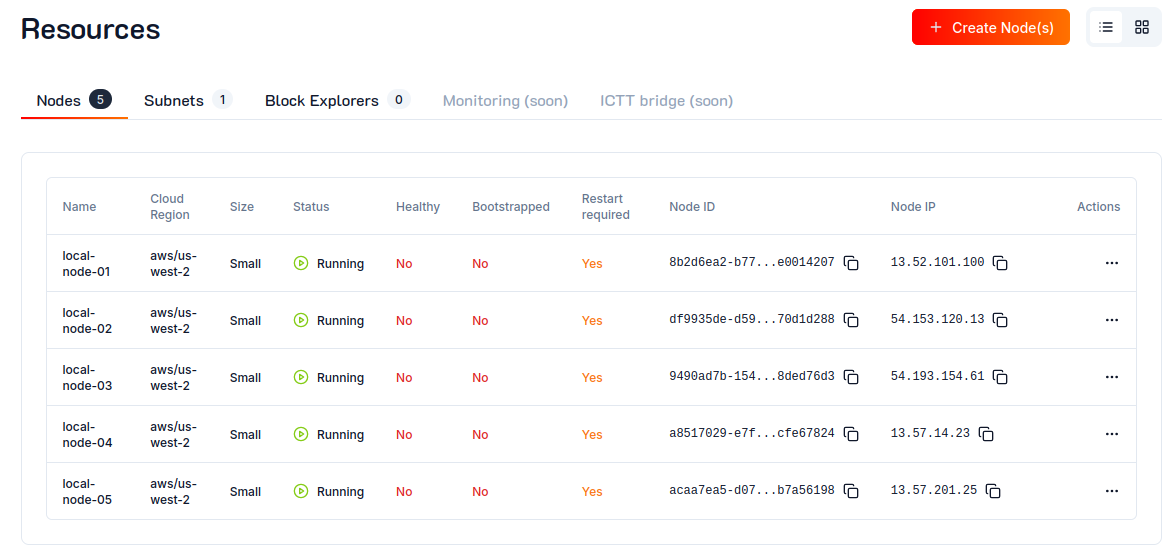
We can confirm this by navigating to the Ressources tab and see that the Restart required field is set to Yes for each node:

After restarting every node by clicking on ... and then Restart button, the nodes will join the Subnet.
After a few minutes, we can see that the nodes' uptime is updated:

After a few minutes, we can get the Subnet ID, control keys, blockchains, and validator nodes information from the subnetStatus field returned by the console resource info command:
ash console resource info ash-subnet --json | jq '.subnetStatus'
We use the --json flag to get the extended information about the Subnet. All those information cannot be displayed in a table format.
{
  "blockchains": [
    {
      "id": "RfX8YRUHePxFENBZFwaNt1tP6CR6RQ4hJJ5AqYv49LRoSKniK",
      "name": "AshLocalEVM",
      "vm_id": "srEXiWaHuhNyGwPUi444Tu47ZEDwxTWrbQiuD7FmgSAQ6X7Dy",
      "vm_type": "SubnetEVM"
    }
  ],
  "controlKeys": [
    "P-local18jma8ppw3nhx5r4ap8clazz0dps7rv5u00z96u"
  ],
  "id": "29uVeLPJB1eQJkzRemU8g8wZDw5uJRqpab5U2mX9euieVwiEbL",
  "pendingValidators": [],
  "subnetType": "Permissioned",
  "threshold": 1,
  "validators": [
    {
      "connected": true,
      "end_time": 1707486609,
      "node_id": "NodeID-MFrZFVCXPv5iCn6M9K6XduxGTYp891xXZ",
      "stake_amount": 100,
      "start_time": 1706881809,
      "tx_id": "DhEgYijBur6QDUDgUMpmDAyF5XGyq6JwG919B8bkryDLijvua",
      "uptime": 100,
      "weight": 100
    },
    # ...
  ]
}
Blockchain RPC endpoint
- Using the Ash Console
- Using the Ash Console
Navigate to the Subnet page to display the RPC endpoint that can be used to query the Subnet EVM blockchain (e.g. to connect a Web3 wallet):

The CLI provides a powerful helper to get the RPC endpoint that can be used to query the Subnet EVM blockchain (e.g. to connect a Web3 wallet). Provide the avalancheNode resource name to be used as RPC and the avalancheSubnet resource name:
ash console helper rpc local-node-01 ash-subnet
AshLocalEVM RCP endpoint:
  http://44.223.28.33:9650/ext/bc/RfX8YRUHePxFENBZFwaNt1tP6CR6RQ4hJJ5AqYv49LRoSKniK/rpc
See the reference for more information about resources lifecycle management.
Checkout Contract Deployment to learn how to deploy a smart contract on your Subnet EVM L1.