Resource Management
UPDATE: The Ash Console open beta has ended. Looking to launch your Avalanche L1? See our latest Ash Managed L1s offer announcement!
Resources are the core feature of the Ash Console. They are the building blocks of your infrastructure, deployed in cloud regions of your cloud account/subscription/project and managed by Ash.
The Ash Console alpha supports AvalancheNode resources.
Resources live under a project and a cloud region. To manage resources, you need to have at least one project and one cloud region.
Types of resources
There are several types of resources. See Resource for more information.
List resources
- Using the Ash Console
- Using the Ash CLI
- Using the Ash Console API
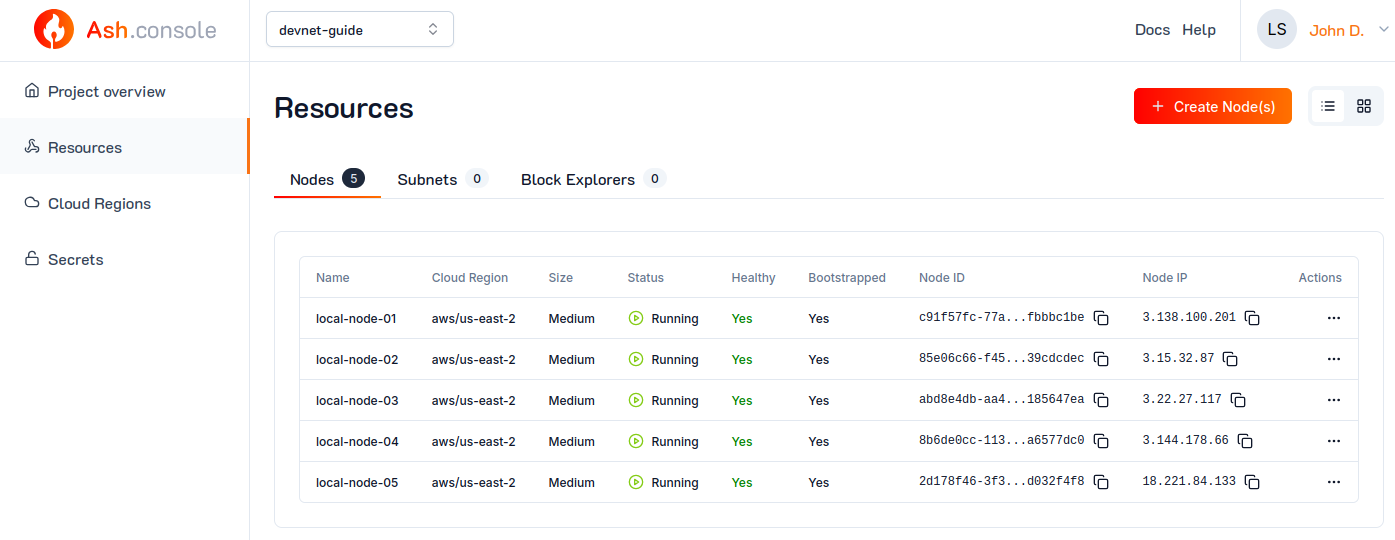
From the Ash Console project overview page, navigate to the Ressources tab:
The Ash CLI displays information in a table format by default. To get a more detailed output (or for scripting), use the --json flag.
To list resources you have access to, run:
ash console resource list
Resources of project 'my-devnet-project':
+---------------+-------------+------+--------------+------+------------+--------+-------------------+
| Resource name | Resource ID | Type | Cloud region | Size | Created at | Status | Resource specific |
+===============+=============+======+==============+======+============+========+===================+
+---------------+-------------+------+--------------+------+------------+--------+-------------------+
See Authentication for more information on how to get an access token.
The secret API endpoint is /secrets.:
curl https://api.console.ash.center/projects/e05f4f15-f5ca-4ac7-b38c-0726e256c70b/resources \
  -H "Authorization: Bearer ${access_token}"
[]
Create a resource
Each resource type has specific requirements, e.g. a nodeId secret is required to create an AvalancheNode resource.
Resource specific requirements
AvalancheNode
{
  "name": "my-avalanche-node",
  "resourceType": "avalancheNode",
  "cloudRegionId": "ff69b281-917e-4ebb-b1e0-f5dc1da297fa",
  "nodeIdSecretId": "4cc8f792-83af-475d-8be0-20c35efc1bd4",
  "size": "small",
  "nodeConfig": {
    "isBootstrapNode": true,
    "avalancheNodeConfig": {
      "avalanchego_version": "1.10.10"
    }
  }
}
You can pass any variable available in the ash.avalanche.node role under nodeConfig.avalancheNodeConfig.
You can provide the secrets' or cloud regions' names instead of their IDs.
- Using the Ash Console
- Using the Ash CLI
- Using the Ash Console API
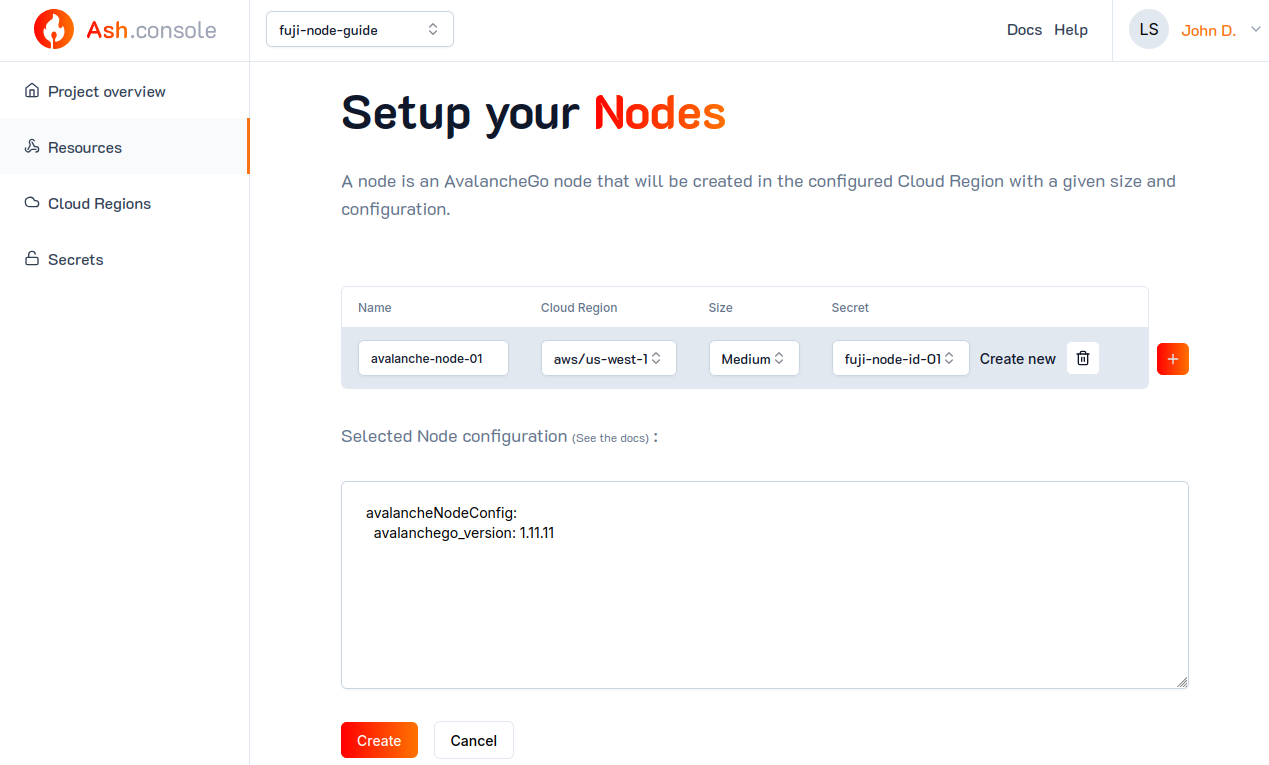
From the Ash Console project overview page, navigate to the Ressources tab:
- Click on the
Create Node(s)button. - Configure the node as needed
- Click on the
Createbutton.
To create a new resource, use the create resource command and provide the required resource properties as JSON.
ash console resource create '{
  name: my-avalanche-node,
  resourceType: avalancheNode,
  cloudRegionId: ff69b281-917e-4ebb-b1e0-f5dc1da297fa,
  nodeIdSecretId: my-node-id,
  size: small,
  nodeConfig: {
    isBootstrapNode: true,
    avalancheNodeConfig: {
      avalanchego_version: 1.10.10
    }
  }
}'
Resource successfully created in project '399b6f5b-eed2-4713-8b68-993643babfd0'!
+--------------------------------------+-------------------+---------------+--------------------------------------+-------+------------------+---------+--------------------------+
| Resource ID                          | Name              | Type          | Cloud region ID                      | Size  | Created at       | Status  | Resource specific        |
+======================================+===================+===============+======================================+=======+==================+=========+==========================+
| 70877036-e8df-4ad3-af95-c0f085a094a6 | my-avalanche-node | AvalancheNode | ff69b281-917e-4ebb-b1e0-f5dc1da297fa | Small | 2023-11-10T16:41 | Pending |  IP address   | pending  |
|                                      |                   |               |                                      |       |                  |         |  Running      | false    |
|                                      |                   |               |                                      |       |                  |         |  Bootstrapped | [false]  |
|                                      |                   |               |                                      |       |                  |         |  Healthy      | [false]  |
|                                      |                   |               |                                      |       |                  |         |  Restart req. | false    |
+--------------------------------------+-------------------+---------------+--------------------------------------+-------+------------------+---------+--------------------------+
To create a new resource, you have to send a POST request with the required secret properties as JSON:
curl -X POST https://api.console.ash.center/projects/399b6f5b-eed2-4713-8b68-993643babfd0/resources \
  -H "Authorization: Bearer ${access_token}" \
  -H "Content-Type: application/json" \
  -d '{
  "name": "my-avalanche-node",
  "resourceType": "avalancheNode",
  "cloudRegionId": "ff69b281-917e-4ebb-b1e0-f5dc1da297fa",
  "nodeIdSecretId": "4cc8f792-83af-475d-8be0-20c35efc1bd4",
  "size": "small",
  "nodeConfig": {
    "isBootstrapNode": true,
    "avalancheNodeConfig": {
      "avalanchego_version": "1.10.10"
    }
  }
}'
{
  "id": "157f2652-8282-4738-937f-b11e8dcb7f38",
  "cloudRegionId": "ff69b281-917e-4ebb-b1e0-f5dc1da297fa",
  "name": "my-avalanche-node",
  "resourceType": "avalancheNode",
  "status": "pending",
  "size": "small",
  "ownerId": "287090ee-7fae-4bd7-9263-d690959edc26",
  "projectId": "399b6f5b-eed2-4713-8b68-993643babfd0",
  "created": "2023-11-10T17:03:21.545230",
  "nodeIdSecretId": "4cc8f792-83af-475d-8be0-20c35efc1bd4",
  "nodeConfig": {
    "ansibleAvalancheCollectionVersion": "v0.8.9",
    "isBootstrapNode": true,
    "avalancheNodeConfig": {
      "avalanchego_version": "1.10.10"
    }
  },
  "nodeStatus": {
    "running": false,
    "bootstrapped": {
      "all": false
    },
    "healthy": {
      "all": false
    },
    "restartRequired": false
  },
  "nodeIp": "pending"
}
Note: See Resource sizes for a list of available resource sizes.
Get a resource and its status
A resource can be in one of the following statuses:
pending: the resource is pending for a machine to be allocated in the cloud regionconfiguring: the resource is being configuredrunning: the resource is runningstopped: the resource is stoppederror: the resource is in an error statedestroying: the resource is being destroyed
You can also provide the resource name instead of its ID.
- Using the Ash Console
- Using the Ash CLI
- Using the Ash Console API
From the Ash Console project overview page, navigate to the Ressources tab and click on a Resource:

To get information about a resource, including its status, use the resource info command and provide the resource ID.
ash console resource info 70877036-e8df-4ad3-af95-c0f085a094a6
Resource '70877036-e8df-4ad3-af95-c0f085a094a6' of project '399b6f5b-eed2-4713-8b68-993643babfd0':
+--------------------------------------+-------------------+---------------+--------------------------------------+-------+------------------+---------+------------------------------+
| Resource ID                          | Name              | Type          | Cloud region ID                      | Size  | Created at       | Status  | Resource specific            |
+======================================+===================+===============+======================================+=======+==================+=========+==============================+
| 70877036-e8df-4ad3-af95-c0f085a094a6 | my-avalanche-node | AvalancheNode | ff69b281-917e-4ebb-b1e0-f5dc1da297fa | Small | 2023-11-10T16:41 | Running |  IP address   | 20.74.16.34  |
|                                      |                   |               |                                      |       |                  |         |  Running      | true         |
|                                      |                   |               |                                      |       |                  |         |  Bootstrapped | [false]      |
|                                      |                   |               |                                      |       |                  |         |  Healthy      | [false]      |
|                                      |                   |               |                                      |       |                  |         |  Restart req. | false        |
+--------------------------------------+-------------------+---------------+--------------------------------------+-------+------------------+---------+------------------------------+
You can get information about a resource, including its status by sending a GET to the projects/${projectId}/resources/${resourceId} endpoint:
curl https://api.console.ash.center/projects/399b6f5b-eed2-4713-8b68-993643babfd0/resources/157f2652-8282-4738-937f-b11e8dcb7f38 \
  -H "Authorization: Bearer ${access_token}"
{
  "id": "157f2652-8282-4738-937f-b11e8dcb7f38",
  "cloudRegionId": "ff69b281-917e-4ebb-b1e0-f5dc1da297fa",
  "name": "my-avalanche-node",
  "resourceType": "avalancheNode",
  "status": "running",
  "size": "small",
  "ownerId": "287090ee-7fae-4bd7-9263-d690959edc26",
  "projectId": "399b6f5b-eed2-4713-8b68-993643babfd0",
  "created": "2023-11-10T17:03:21.545230",
  "nodeIdSecretId": "4cc8f792-83af-475d-8be0-20c35efc1bd4",
  "nodeConfig": {
    "ansibleAvalancheCollectionVersion": "v0.8.9",
    "isBootstrapNode": true,
    "avalancheNodeConfig": {
      "avalanchego_version": "1.10.10"
    }
  },
  "nodeStatus": {
    "running": true,
    "bootstrapped": {
      "all": false
    },
    "healthy": {
      "all": false
    },
    "restartRequired": false
  },
  "nodeIp": "20.19.110.67"
}
Update a resource
For some resource types, updates will not take effect until the resource is restarted. See Restart a resource.
- Using the Ash Console
- Using the Ash CLI
- Using the Ash Console API
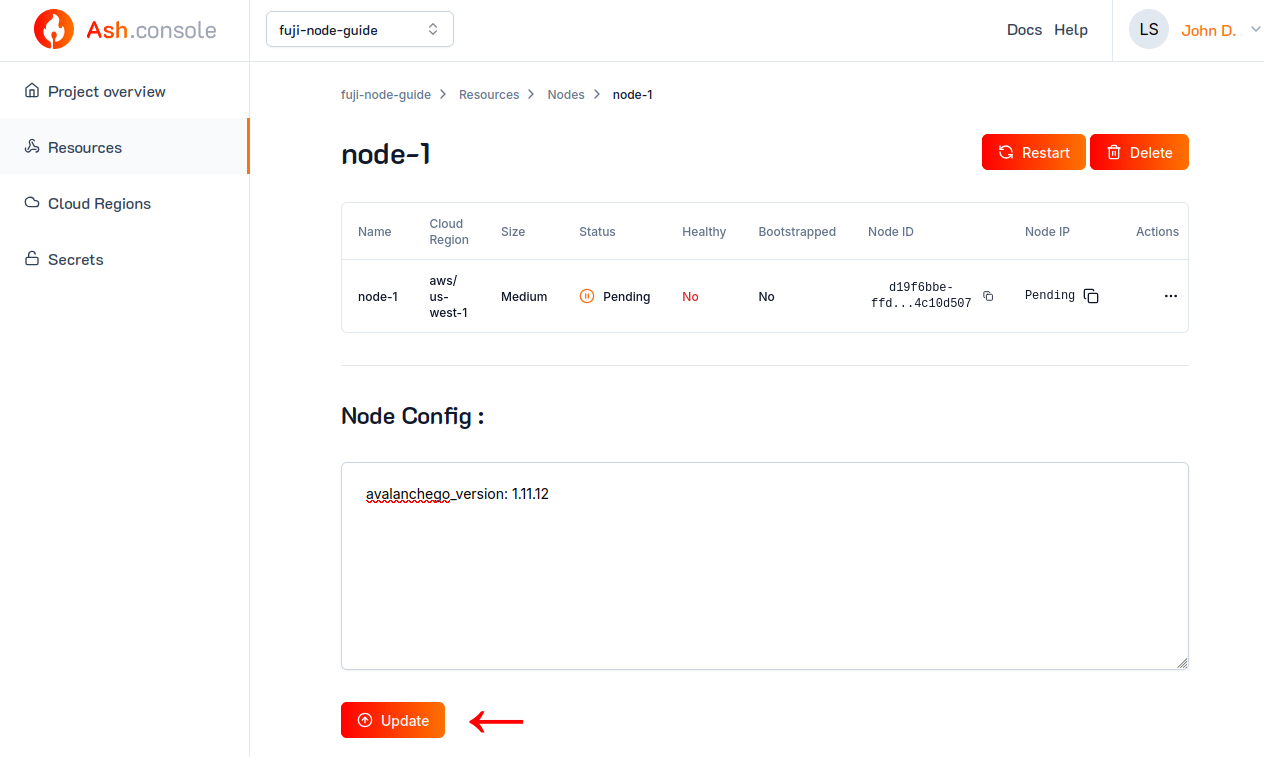
From the Ash Console project overview page, navigate to the Ressources tab and click on a Resource:
Change the resource properties as needed and click on the Update button.
The properties that can be updated depend on the resource type. For example, you can update an avalancheNode resource's name and nodeConfig:
ash console resource update my-avalanche-node '{name: my-avalanche-node-v2}'
Resource updated successfully!
+--------------------------------------+----------------------+---------------+--------------------------------------+-------+------------------+---------+------------------------------+
| Resource ID                          | Name                 | Type          | Cloud region ID                      | Size  | Created at       | Status  | Resource specific            |
+======================================+======================+===============+======================================+=======+==================+=========+==============================+
| 70877036-e8df-4ad3-af95-c0f085a094a6 | my-avalanche-node-v2 | AvalancheNode | ff69b281-917e-4ebb-b1e0-f5dc1da297fa | Small | 2023-11-10T16:41 | Running |  IP address   | 20.74.16.34  |
|                                      |                      |               |                                      |       |                  |         |  Running      | true         |
|                                      |                      |               |                                      |       |                  |         |  Bootstrapped | [false]      |
|                                      |                      |               |                                      |       |                  |         |  Healthy      | [false]      |
|                                      |                      |               |                                      |       |                  |         |  Restart req. | false        |
+--------------------------------------+----------------------+---------------+--------------------------------------+-------+------------------+---------+------------------------------+
The properties that can be updated depend on the resource type. For example, you can update an avalancheNode resource's name and nodeConfig by sending a PATCH to the projects/${projectId}/resources/${resourceId} endpoint:
curl -X PATCH https://api.console.ash.center/projects/399b6f5b-eed2-4713-8b68-993643babfd0/resources/my-avalanche-node \
  -H "Authorization: Bearer ${access_token}" \
  -H "Content-Type: application/json" \
  -d '{"name": "my-avalanche-node-v2"}'
{
  "id": "157f2652-8282-4738-937f-b11e8dcb7f38",
  "cloudRegionId": "ff69b281-917e-4ebb-b1e0-f5dc1da297fa",
  "name": "my-avalanche-node-v2",
  "resourceType": "avalancheNode",
  "status": "running",
  "size": "small",
  "ownerId": "287090ee-7fae-4bd7-9263-d690959edc26",
  "projectId": "399b6f5b-eed2-4713-8b68-993643babfd0",
  "created": "2023-11-10T17:03:21.545230",
  "nodeIdSecretId": "4cc8f792-83af-475d-8be0-20c35efc1bd4",
  "nodeConfig": {
    "ansibleAvalancheCollectionVersion": "v0.8.9",
    "isBootstrapNode": true,
    "avalancheNodeConfig": {
      "avalanchego_version": "1.10.10"
    }
  },
  "nodeStatus": {
    "running": true,
    "bootstrapped": {
      "all": false
    },
    "healthy": {
      "all": false
    },
    "restartRequired": false
  },
  "nodeIp": "20.19.110.67"
}
Restart a resource
Restarting a resource will apply any pending configuration changes and is required if the resource has "restartRequired": true in its status.
Restarting a resource will interrupt its service for a few seconds/minutes.
- Using the Ash Console
- Using the Ash CLI
- Using the Ash Console API
From the Ash Console project overview page, navigate to the Ressources tab and click on a Resource:

You can then click on the Restart button.
The CLI will ask for confirmation before restarting the resource. To skip the confirmation, use the --yes flag.
ash console resource restart 70877036-e8df-4ad3-af95-c0f085a094a6
Resource updated successfully!
+--------------------------------------+----------------------+---------------+--------------------------------------+-------+------------------+---------+------------------------------+
| Resource ID                          | Name                 | Type          | Cloud region ID                      | Size  | Created at       | Status  | Resource specific            |
+======================================+======================+===============+======================================+=======+==================+=========+==============================+
| 70877036-e8df-4ad3-af95-c0f085a094a6 | my-avalanche-node-v2 | AvalancheNode | ff69b281-917e-4ebb-b1e0-f5dc1da297fa | Small | 2023-11-10T16:41 | Running |  IP address   | 20.74.16.34  |
|                                      |                      |               |                                      |       |                  |         |  Running      | true         |
|                                      |                      |               |                                      |       |                  |         |  Bootstrapped | [false]      |
|                                      |                      |               |                                      |       |                  |         |  Healthy      | [false]      |
|                                      |                      |               |                                      |       |                  |         |  Restart req. | false        |
+--------------------------------------+----------------------+---------------+--------------------------------------+-------+------------------+---------+------------------------------+
A resource can be restarted by sending a POST to the projects/${projectId}/resources/${resourceId}/restart endpoint:
curl -X POST https://api.console.ash.center/projects/399b6f5b-eed2-4713-8b68-993643babfd0/resources/157f2652-8282-4738-937f-b11e8dcb7f38/restart \
  -H "Authorization: Bearer ${access_token}"
{
  "id": "157f2652-8282-4738-937f-b11e8dcb7f38",
  "cloudRegionId": "ff69b281-917e-4ebb-b1e0-f5dc1da297fa",
  "name": "my-avalanche-node-v2",
  "resourceType": "avalancheNode",
  "status": "running",
  "size": "small",
  "ownerId": "287090ee-7fae-4bd7-9263-d690959edc26",
  "projectId": "399b6f5b-eed2-4713-8b68-993643babfd0",
  "created": "2023-11-10T17:03:21.545230",
  "nodeIdSecretId": "4cc8f792-83af-475d-8be0-20c35efc1bd4",
  "nodeConfig": {
    "ansibleAvalancheCollectionVersion": "v0.8.9",
    "isBootstrapNode": true,
    "avalancheNodeConfig": {
      "avalanchego_version": "1.10.10"
    }
  },
  "nodeStatus": {
    "running": true,
    "bootstrapped": {
      "all": false
    },
    "healthy": {
      "all": false
    },
    "restartRequired": false
  },
  "nodeIp": "20.19.110.67"
}
Delete a resource
Removing a resource is not instantaneous. The resource will be in status destroying for a few seconds/minutes before it is completely removed.
- Using the Ash Console
- Using the Ash CLI
- Using the Ash Console API
From the Ash Console project overview page, navigate to the Ressources tab and click on a Resource:

You can then click on the Delete button.
ash console resource delete 70877036-e8df-4ad3-af95-c0f085a094a6
> Are you sure you want to delete this resource? Yes
Resource deleted successfully!
curl -X DELETE https://api.console.ash.center/projects/399b6f5b-eed2-4713-8b68-993643babfd0/resources/157f2652-8282-4738-937f-b11e8dcb7f38 \
  -H "Authorization: Bearer ${access_token}"
{
  "id": "157f2652-8282-4738-937f-b11e8dcb7f38",
  "cloudRegionId": "ff69b281-917e-4ebb-b1e0-f5dc1da297fa",
  "name": "my-avalanche-node-v2",
  "resourceType": "avalancheNode",
  "status": "destroying",
  "size": "small",
  "ownerId": "287090ee-7fae-4bd7-9263-d690959edc26",
  "projectId": "399b6f5b-eed2-4713-8b68-993643babfd0",
  "created": "2023-11-10T17:03:21.545230",
  "nodeIdSecretId": "4cc8f792-83af-475d-8be0-20c35efc1bd4",
  "nodeConfig": {
    "ansibleAvalancheCollectionVersion": "v0.8.9",
    "isBootstrapNode": true,
    "avalancheNodeConfig": {
      "avalanchego_version": "1.10.10"
    }
  },
  "nodeStatus": {
    "running": true,
    "bootstrapped": {
      "all": false
    },
    "healthy": {
      "all": false
    },
    "restartRequired": false
  },
  "nodeIp": "20.19.110.67"
}
Resource sizes
The size property of a resource is used to determine the machine type to use. The available sizes depend on the cloud provider.
Here are the available sizes per resource type and their corresponding machine types in each cloud provider:
AvalancheNode
| Size | RAM | CPU | Disk | Azure VM type | AWS EC2 instance type | GCP machine type |
|---|---|---|---|---|---|---|
small | 1-2GB | 1-2 | 8-32 (OS) + 50 GiB (resource storage) | Standard_B1ms | t2.small | e2-small |
medium | 8GB | 4 | 8-32 (OS) + 200 GiB (resource storage) | Standard_F4s | c5.xlarge | c2d-highcpu-4 |
large | 16GB | 8 | 8-32 (OS) + 1000 GiB (resource storage) | Standard_F8s | c5.2xlarge | c2d-highcpu-8 |
SSH to a resource
Accessing a resource created via the Ash Console can be useful in-depth debugging and additional configuration. Follow the insctructions below to learn how to SSH into a resource.
- On AWS
- On Azure
- On Google Cloud
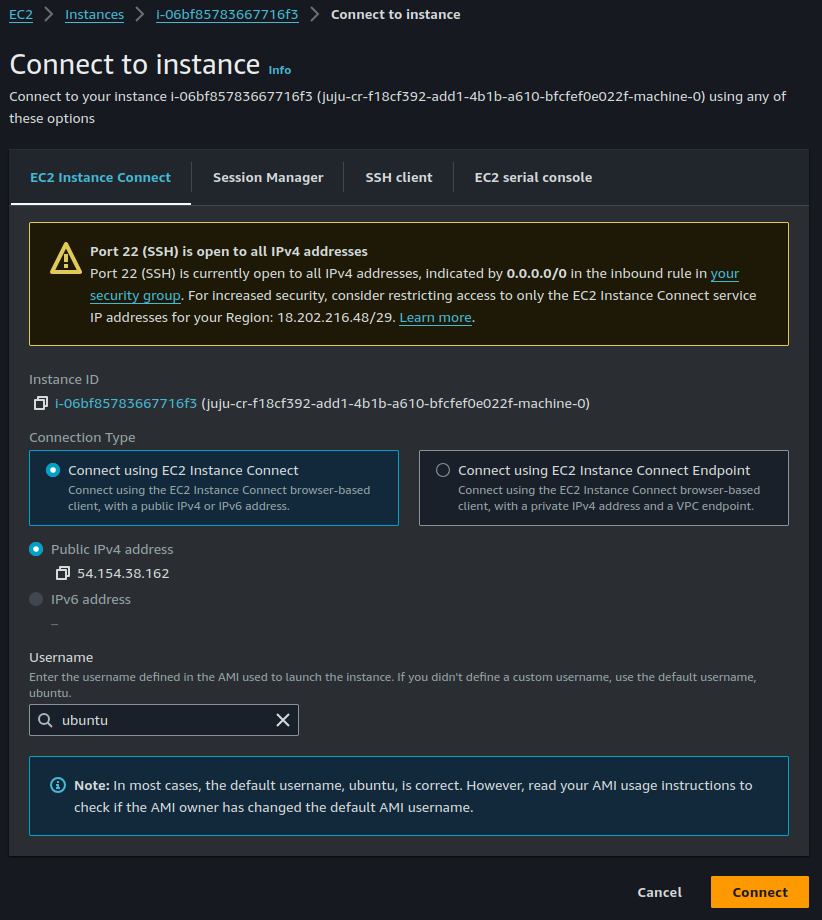
On the AWS Console:
- Navigate to
EC2. - Click on a machine to access its details, resources created by the Ash Console should follow the
juju-cr-x-machine-xname pattern. - Click on the
Connectbutton to open an in-browser SSH session.
Add your SSH public key to /home/ubuntu/.ssh/authorized_keys to SSH without having to go through the Azure Portal.
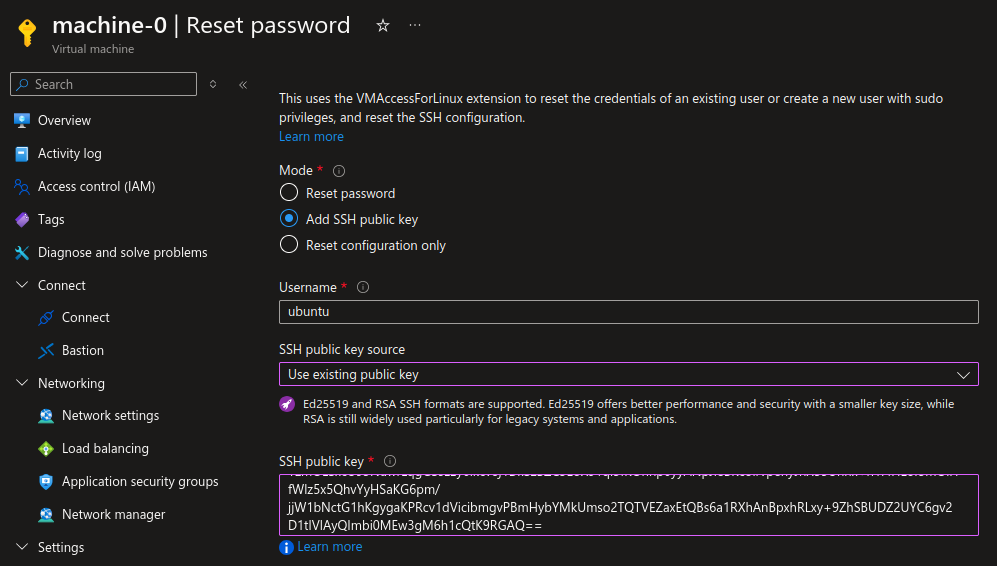
On the Azure Portal:
- Navigate to
Virtual machines. - Click on a machine to access its details, resources created by the Ash Console should follow the
machine-xname pattern. - Go to
Help>Reset password - Add a new SSH public key with
Add SSH public key.
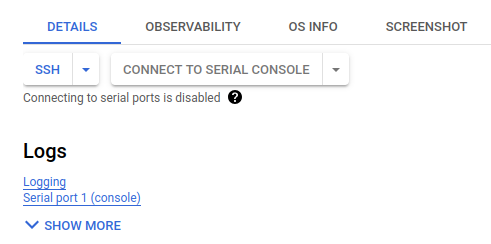
On the Google Cloud console:
- Navigate to
Compute Engine>VM instances. - Click on a machine to access its details, resources created by the Ash Console should follow the
juju-xname pattern. - Click on the
SSHbutton to open an in-browser SSH session.
Add your SSH public key to /home/ubuntu/.ssh/authorized_keys to SSH without having to go through the Google Cloud.