4. Avalanche Nodes Creation
UPDATE: The Ash Console open beta has ended. Looking to launch your Avalanche L1? See our latest Ash Managed L1s offer announcement!
Running this step will occur costs on your cloud provider account.
We can finally deploy our 5 Avalanche node resources!
- Using the Ash Console
- Using the Ash CLI
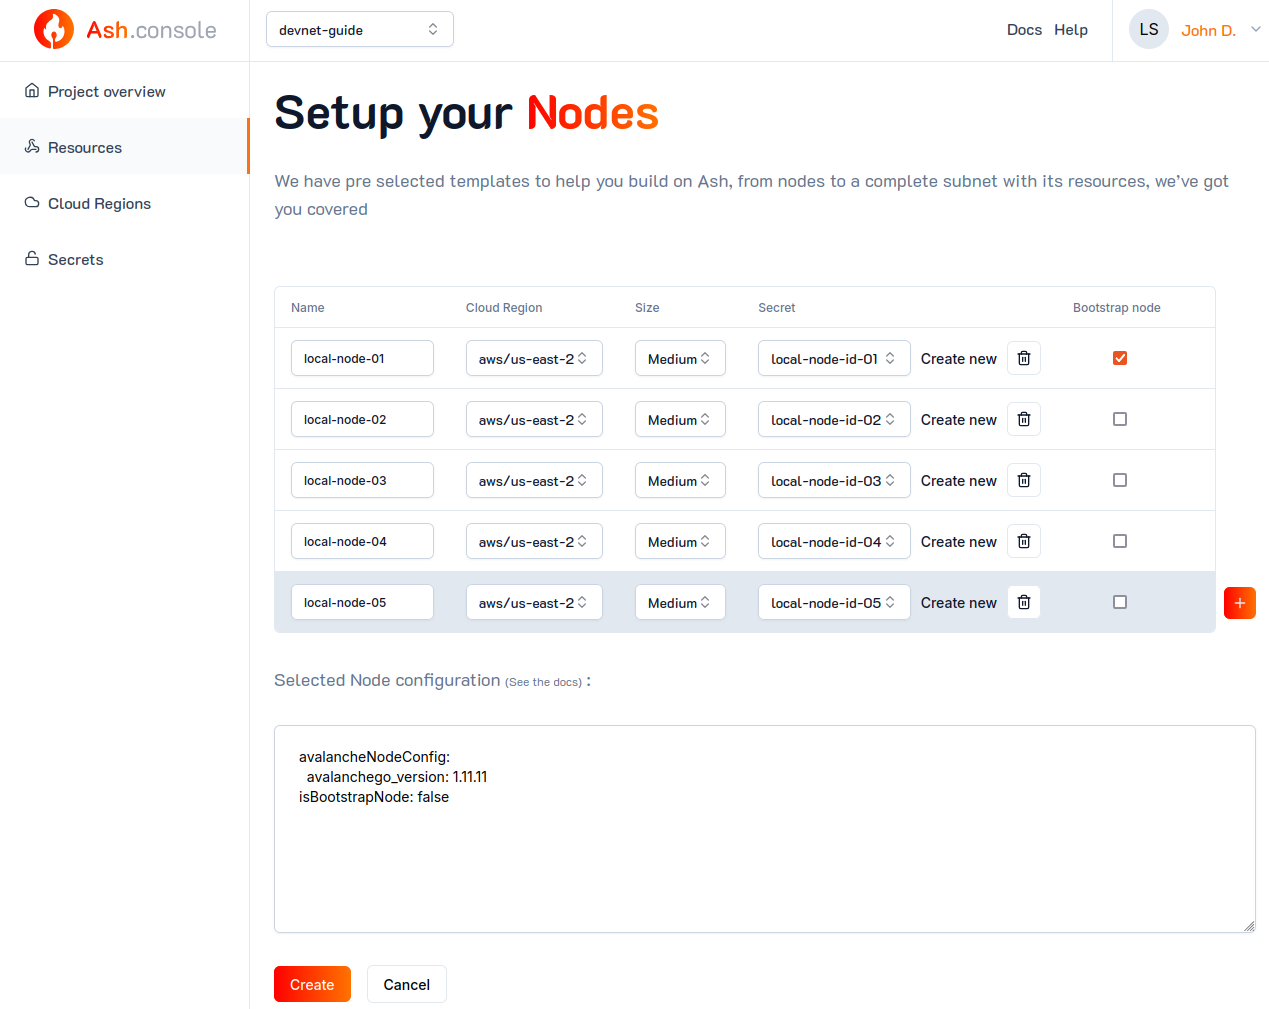
From the Ash Console project overview page, navigate to the Ressources tab:
- Click on the
Create Node(s)button. - Set
local-node-01for the name of the first node. - Select the cloud region you added in the previous step.
- Choose a VM size between
small,medium, andlarge(see Resource sizes for details on available sizes).
For a devnet node, we recommend thesmallsize. - Select the
local-node-id-01secret you created in the previous step. - (Optional) Configure the node with custom configurations if needed. See the ash.avalanche.node reference doc for a list of all supported configuration keys.
- Click on the
+button and repeat the process to add the 4 other nodes.

Make sure to select the appropriate Node ID secret for each node and that the Bootstrap node option is ticked for the first node only.
Once the 5 nodes are in the list, click on the Create button.
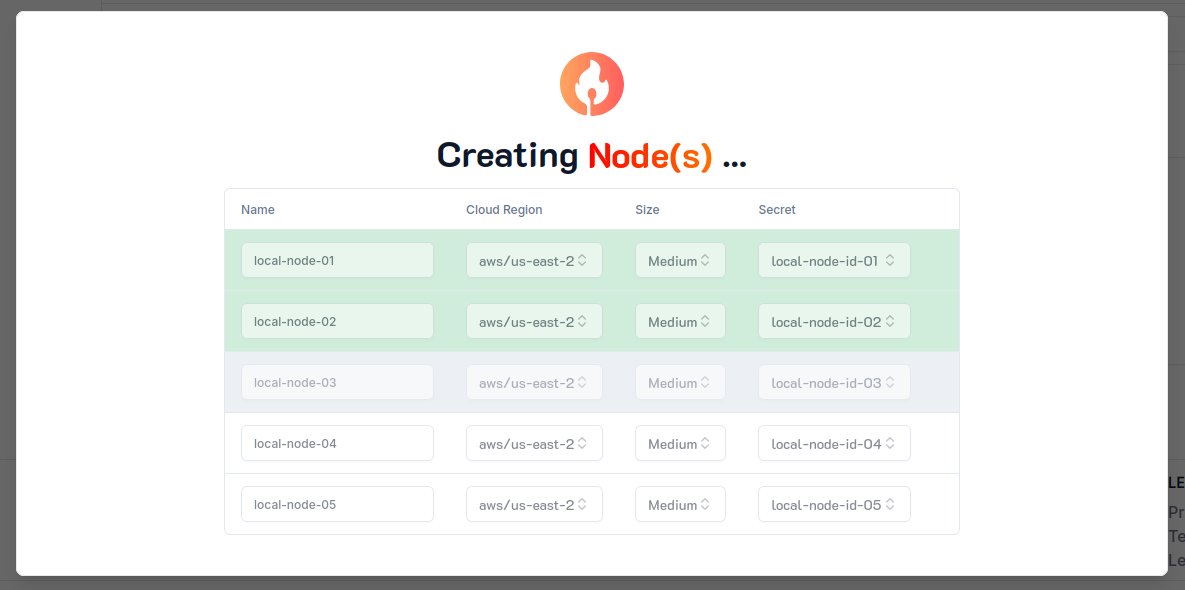
The nodes will then be created one by one, this step can take up to a minute depending on the cloud provider:

Health
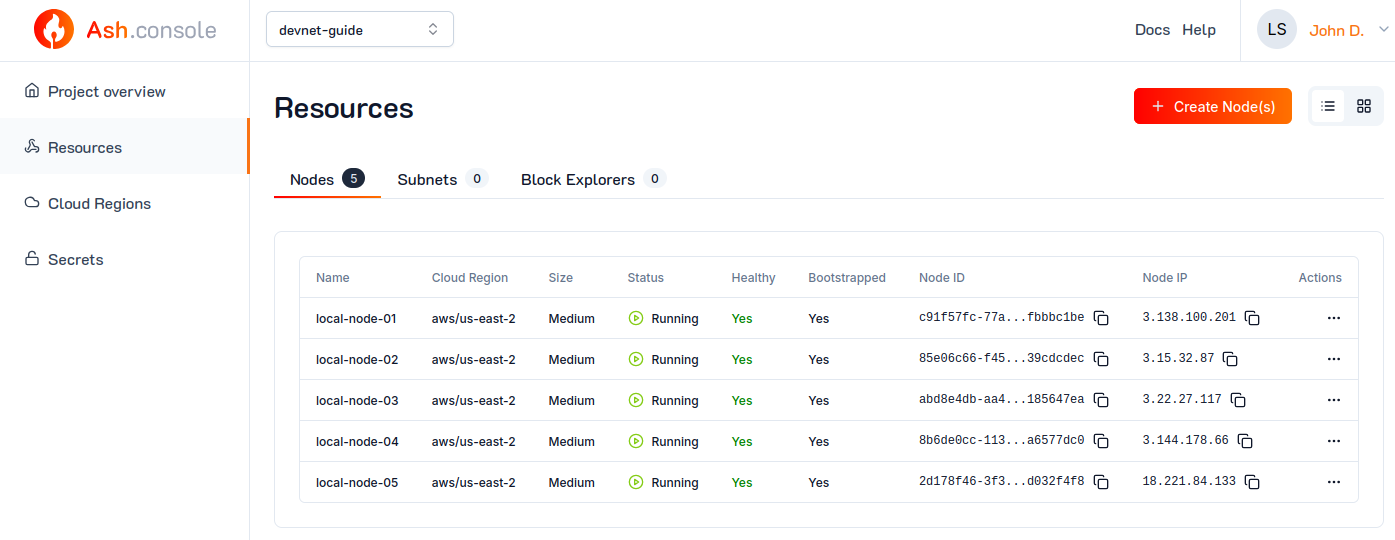
It will take a few minutes before the local network is Bootstrapped and Healthy. You can get its updated status by clicking on the node name in the list of resources:

You can SSH into any Ash Console-created resource. See SSH to a resource for details.
Once a node is Running, you can also query the node info endpoint with the avalanche node info command:
ash avalanche node info -n 3.138.100.201
Node '3.138.100.201:9650':
  ID:            NodeID-7Xhw2mDxuDS44j42TCB6U5579esbSt3Lg
  Signer (BLS):
    Public key:  0x900c9b119b5c82d781d4b49be78c3fc7ae65f2b435b7ed9e3a8b9a03e475edff86d8a64827fec8db23a6f236afbf127d
    PoP:         0x8bfd6d4d2086b2b8115d8f72f94095fefe5a6c07876b2accf51a811adf520f389e74a3d2152a6d90b521e2be58ffe468043dc5ea68b4c44410eb67f8dc24f13ed4f194000764c0e922cd254a3588a4962b1cb4db7de4bb9cda9d9d4d6b03f3d2
  Network:       local
  Public IP:     3.138.100.201
  Staking port:  9651
  Versions:
    AvalancheGo:  avalanchego/1.11.11
    Database:     v1.4.5
    RPC Protocol: 37
    Git commit:   d3c09eb19d6e8c85a4757f17cd5da7e713c2baba
    VMs:
      AvalancheVM: v1.11.11
      Coreth:      v0.13.7
      PlatformVM:  v1.11.11
      Subnet VMs:
        'srEXiWaHuhNyGwPUi444Tu47ZEDwxTWrbQiuD7FmgSAQ6X7Dy': v0.6.10
  Uptime:
    Rewarding stake:  100%
    Weighted average: 100%
Your node IP address will be different.
Your local Avalanche network is now up and running!
Set shared configuration at the project level
It is common that resources of the same project share some configuration. For example, all the Avalanche nodes of our devnet will have the same AvalancheGo version.
We will use the sharedResourceConfig field of the project to set this shared configuration:
ash console project update devnet-guide '{
  sharedResourceConfig: {
    avalancheNodeConfig: {
      avalanchego_version: 1.10.17,
      avalanchego_vms_install: {
        subnet-evm: 0.5.10
      }
    }
  }
}'
To see the sharedResourceConfig of a project, use the console project info command with the --json flag:
ash console project info devnet-guide --json | jq
{
  "cloudRegionsIds": {
    "aws/us-east-1": "634d78b0-c8ba-44ac-a08b-5b27300ac9d9"
  },
  "created": "2023-12-21T15:55:06.285003",
  "id": "ac00583b-7b98-4a3a-9a43-2402f8796673",
  "name": "devnet-guide",
  "network": "local",
  "ownerId": "287090ee-7fae-4bd7-9263-d690959edc26",
  "resourcesIds": {},
  "sharedResourceConfig": {
    "avalancheNodeConfig": {
      "avalanchego_version": "1.10.17"
    }
  }
}
Bootstrap node creation
Gather the cloud region secret ID from the previous steps.
Create the
avalancheNode"local-node-01" resource with theconsole resource createcommand:Commandash console resource create '{
name: local-node-01,
resourceType: avalancheNode,
cloudRegionId: aws/us-east-1,
nodeIdSecretId: local-node-id-01,
size: medium,
nodeConfig: {
isBootstrapNode: true
}
}'OutputResource successfully created in project 'devnet-guide'!
+-------------------+-------------+---------------+-----------------+--------+------------------+---------+--------------------------+
| Resource name | Resource ID | Type | Cloud region ID | Size | Created at | Status | Resource specific |
+===================+=============+===============+=================+========+==================+=========+==========================+
| local-node-01 | 9419...6722 | AvalancheNode | 634d...c9d9 | Medium | 2023-12-21T16:01 | Pending | IP address | None |
| | | | | | | | Running | false |
| | | | | | | | Bootstrapped | [false] |
| | | | | | | | Healthy | [false] |
| | | | | | | | Restart req. | false |
+-------------------+-------------+---------------+-----------------+--------+------------------+---------+--------------------------+Note: See Resource sizes for available resource sizes.
local-node-01 is the "bootstrap" node. It has a different configuration than the other nodes of the local Avalanche network. See the Create a resource for more information.
Other nodes creation
Create the 4 other avalancheNode resources with the console resource create command:
for i in {2..5}; do
  ash console resource create "{
    name: local-node-0$i,
    resourceType: avalancheNode,
    cloudRegionId: aws/us-east-1,
    nodeIdSecretId: local-node-id-0$i,
    size: medium,
    nodeConfig: {
      isBootstrapNode: false
    },
    nodeBootstrapResourceId: local-node-01
  }"
done
- The above command takes about 1 minute to complete.
- Providing a
nodeBootstrapResourceIdis only supported for resources created in the same cloud region as the bootstrap node.
Health
It will take a few minutes before the local network is
BootstrappedandHealthy. You can get its updated status with theconsole resource infocommand:Commandash console resource info local-node-01OutputResource 'local-node-01' of project 'devnet-guide':
+-------------------+-------------+---------------+-----------------+--------+------------------+---------+--------------------------------+
| Resource name | Resource ID | Type | Cloud region ID | Size | Created at | Status | Resource specific |
+===================+=============+===============+=================+========+==================+=========+================================+
| local-node-01 | 9419...6722 | AvalancheNode | 634d...c9d9 | Medium | 2023-12-21T16:01 | Running | IP address | 3.210.183.166 |
| | | | | | | | Running | true |
| | | | | | | | Bootstrapped | [false] |
| | | | | | | | Healthy | [false] |
| | | | | | | | Restart req. | false |
+-------------------+-------------+---------------+-----------------+--------+------------------+---------+--------------------------------+Once a node is
Running, you can also query the nodeinfoendpoint with theavalanche node infocommand:Commandash avalanche node info -n 3.210.183.166OutputNode '3.210.183.166:9650':
ID: NodeID-7Xhw2mDxuDS44j42TCB6U5579esbSt3Lg
Network: local
Public IP: 3.210.183.166
Staking port: 9651
Versions:
AvalancheGo: avalanche/1.10.17
Database: v1.4.5
RPC Protocol: 28
Git commit: 145dfb0dc179d688f45ad44067ef6f9821148b36
VMs:
AvalancheVM: v1.10.17
Coreth: v0.12.5
PlatformVM: v1.10.17
Subnet VMs: []
Uptime:
Rewarding stake: 100%
Weighted average: 100%noteYour node IP address will be different.
Your local Avalanche network is now up and running!
See the reference for more information about resources lifecycle management.