6. Block explorer Deployment
The Ash Console is currently in alpha and not production-ready. It is under active development and subject to breaking changes.
In this section, we will create a Blockscout resource on our local network.
In addition to indexing blocks, this instance will be able to verify smart contracts.
Requirements
Before setting up Blockscout, we must deploy at least one local Subnet to be indexed and wait until it's ready, as described in the previous section.
Blockscout creation
- Using the Ash Console
- Using the Ash CLI
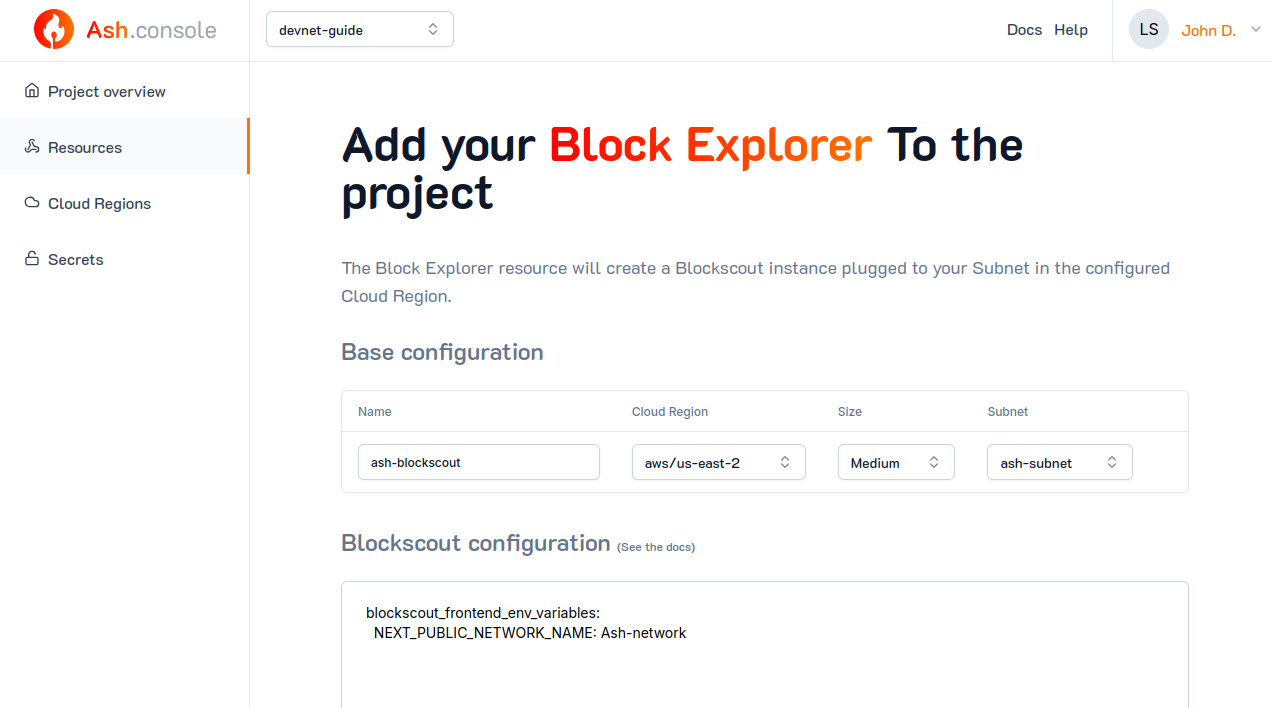
From the Ash Console project overview page, navigate to the Block Explorers tab:
- Click on the
Create Block Explorerbutton. - Pick a name for your Blockscout instance, e.g.,
ash-blockscout. - Select the cloud region you added in the previous step.
- Choose a VM size between
small,medium, andlarge(see Resource sizes for details on available sizes). - Select the
ash-subnetSubnet resource you created in the previous step. - (Optional) Configure the block explorer with custom configurations if needed.
- Click on the
Createbutton.
The blockscoutConfig field is following the same structure as the Ansible Avalanche Collection's ash.avalanche.evm.blockscout role. See Blockscout configuration for more information on how to configure blockscout.

Unlike other resources, there is no secrets to create here.
Blockscout endpoint
After a few minutes, we can get the details on the Blockscout, including its URL:

The following command will create a Blockscout instance.
ash console resource create '{
  name: ash-blockscout,
  resourceType: blockscout,
  cloudRegionId: aws/us-east-1,
  size: medium,
  subnetResourceId: ash-subnet,
  blockscoutConfig: {
    blockscout_frontend_env_variables: {
      NEXT_PUBLIC_NETWORK_NAME: Ash-network
    }
  }
}'
The blockscoutConfig field is following the same structure as the Ansible Avalanche Collection's ash.avalanche.evm.blockscout role. See Blockscout configuration for more information on how to configure blockscout.
Resource successfully created in project 'ash-devnet'!
+----------------+-------------+------------+---------------+--------+------------------+---------+----------------------+
| Resource name  | Resource ID | Type       | Cloud region  | Size   | Created at       | Status  | Resource specific    |
+================+=============+============+===============+========+==================+=========+======================+
| ash-blockscout | e1d6...9a0b | Blockscout | aws/us-east-1 | Medium | 2024-06-07T21:20 | Pending |  IP address |        |
|                |             |            |               |        |                  |         |  Running    | false  |
+----------------+-------------+------------+---------------+--------+------------------+---------+----------------------+
Unlike other resources, there is no secrets to create here.
Blockscout endpoint
After a few minutes, we can get the details on the Blockscout:
ash console resource info ash-blockscout
Resource 'ash-blockscout' of project 'ash-devnet':
+----------------+-------------+------------+---------------+--------+------------------+---------+------------------------------+
| Resource name  | Resource ID | Type       | Cloud region  | Size   | Created at       | Status  | Resource specific            |
+================+=============+============+===============+========+==================+=========+==============================+
| ash-blockscout | e1d6...9a0b | Blockscout | aws/us-east-1 | Medium | 2024-06-07T21:20 | Running |  IP address | 44.210.241.77  |
|                |             |            |               |        |                  |         |  Running    | true           |
+----------------+-------------+------------+---------------+--------+------------------+---------+------------------------------+
The CLI provides a powerful helper to get the URL where the user interface is.
ash console helper blockscout-url ash-blockscout
Explorer URL:
  http:/44.210.241.77:80
See the reference for more information about resources lifecycle management.