Project Management
UPDATE: The Ash Console open beta has ended. Looking to launch your Avalanche L1? See our latest Ash Managed L1s offer announcement!
The first step for an Ash Console user is to create a project: a logical set of resources that are deployed in cloud regions.
List projects
- Using the Ash Console
- Using the Ash CLI
- Using the Ash Console API
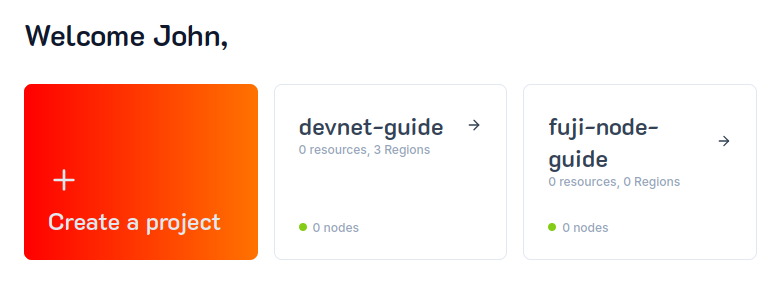
To list projects, navigate to the Ash Console home page:
The Ash CLI displays information in a table format by default. To get a more detailed output (or for scripting), use the --json flag.
To list projects you have access to, run:
ash console project list
+--------------+------------+---------+---------------+-----------+------------+
| Project name | Project ID | Network | Cloud regions | Resources | Created at |
+==============+============+=========+===============+===========+============+
+--------------+------------+---------+---------------+-----------+------------+
See Authentication for more information on how to get an access token.
The project API endpoint is /projects.:
curl https://api.console.ash.center/projects \
  -H "Authorization: Bearer ${access_token}"
[]
Create a project
- Using the Ash Console
- Using the Ash CLI
- Using the Ash Console API
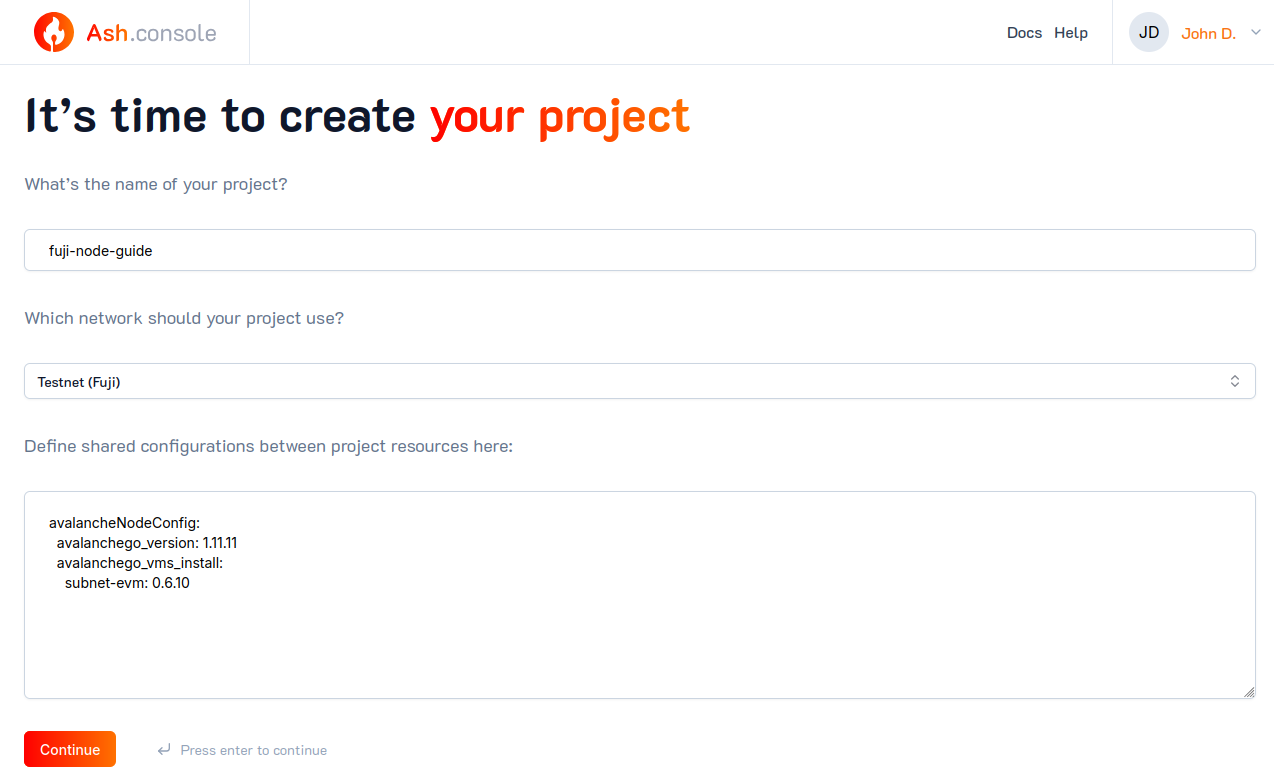
To create a project, navigate to the Ash Console home page and click on the Create a project button:
To create a new project, use the create project command and provide the required project properties as JSON:
ash console project create '{name: my-devnet-project, network: local}'
Project created successfully!
+-------------------+-------------+---------+---------------+-----------+------------------+
| Project name      | Project ID  | Network | Cloud regions | Resources | Created at       |
+===================+=============+=========+===============+===========+==================+
| my-devnet-project | d11f...453e | Local   |               |           | 2024-04-04T15:04 |
+-------------------+-------------+---------+---------------+-----------+------------------+

Switched to project 'my-devnet-project' (d11ff0c8-8f09-4991-9832-bd79df9b453e)!
To create a new project, you have to send a POST request with the required project properties as JSON:
curl -X POST https://api.console.ash.center/projects \
  -H "Authorization: Bearer ${access_token}" \
  -H "Content-Type: application/json" \
  -d '{"name": "my-devnet-project", "network": "local"}'
{
  "id": "5064c6a6-1542-43d9-b8bb-9ce9502347ff",
  "ownerId": "4d4dee2d-e943-432c-91ee-678975615caa",
  "name": "my-devnet-project",
  "network": "local",
  "sharedResourceConfig": {"avalancheNodeConfig": {}},
  "created": "2024-04-04T15:15:10.022849",
  "cloudRegionsIds": {},
  "resourcesIds": {}
}
Select the current project (CLI only)
- Using the Ash CLI
- Using the Ash Console API
The Ash CLI stores the current project in a configuration file. This project will be used by default for all the commands that require a project (e.g. console region ...).
To show the current project, run:
ash console project show
Current project: 'my-devnet-project' (5064c6a6-1542-43d9-b8bb-9ce9502347ff)
You can switch between projects:
ash console project select my-devnet-project
Switched to project 'my-devnet-project' (5064c6a6-1542-43d9-b8bb-9ce9502347ff)!
This feature does not exist in the Ash Console API.
Update a project
You can also provide the project name instead of its ID.
- Using the Ash Console
- Using the Ash CLI
- Using the Ash Console API
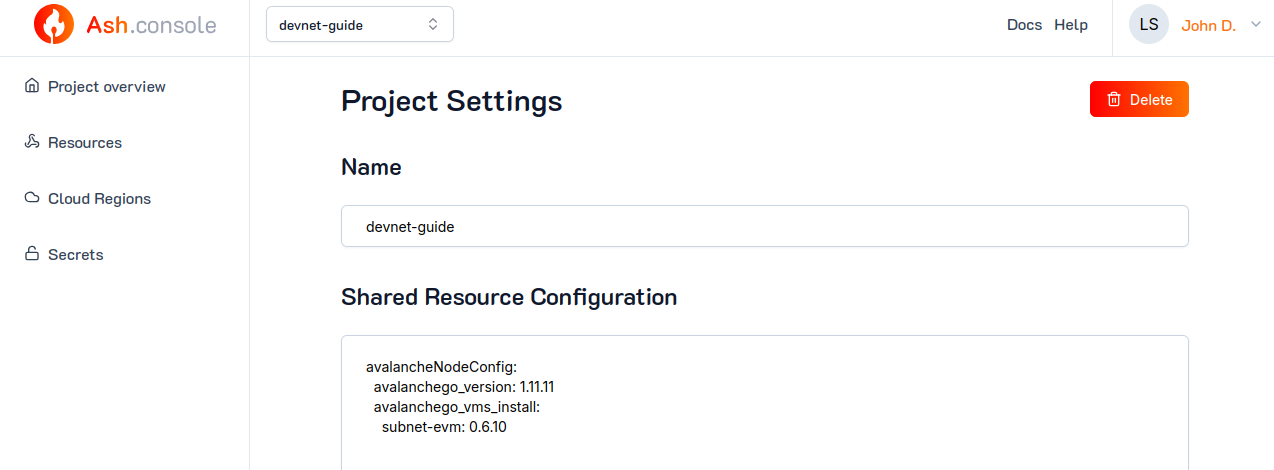
To update a project's configuration, navigate to the Project overview page and click on the Project Settings button:
Edit the configuration as needed and click on the Update button.
The only propery that can be updated is the project name:
ash console project update 5064c6a6-1542-43d9-b8bb-9ce9502347ff '{name: my-devnet-project-updated}'
Project updated successfully!
+---------------------------+-------------+---------+---------------+-----------+------------------+
| Project name              | Project ID  | Network | Cloud regions | Resources | Created at       |
+===========================+=============+=========+===============+===========+==================+
| my-devnet-project-updated | 5064...47ff | Local   |               |           | 2024-04-04T15:15 |
+---------------------------+-------------+---------+---------------+-----------+------------------+
The only propery that can be updated is the project name by sending a PATCH to the projects/${projectId} endpoint:
curl -X PATCH https://api.console.ash.center/projects/5064c6a6-1542-43d9-b8bb-9ce9502347ff \
  -H "Authorization: Bearer ${access_token}" \
  -H "Content-Type: application/json" \
  -d '{"name": "my-devnet-project-updated"}'
{
  "id": "5064c6a6-1542-43d9-b8bb-9ce9502347ff",
  "ownerId": "4d4dee2d-e943-432c-91ee-678975615caa",
  "name": "my-devnet-project-updated",
  "network": "local",
  "sharedResourceConfig": {"avalancheNodeConfig": {}},
  "created": "2024-04-04T15:15:10.022849",
  "cloudRegionsIds": {},
  "resourcesIds": {}
}
Delete a project
Deleting a project will recursively delete all the cloud regions and resources that belong to it!
- Using the Ash Console
- Using the Ash CLI
- Using the Ash Console API
To delete a project, navigate to the Project overview page and click on the Project Settings button:
You can delete the project by clicking on the Delete button.
ash console project delete my-devnet-project-updated
> Are you sure you want to delete this project? Yes
Project deleted successfully!
curl -X DELETE https://api.console.ash.center/projects/my-devnet-project-updated \
  -H "Authorization: Bearer ${access_token}"
{
  "id": "5064c6a6-1542-43d9-b8bb-9ce9502347ff",
  "ownerId": "4d4dee2d-e943-432c-91ee-678975615caa",
  "name": "my-devnet-project-updated",
  "network": "local",
  "sharedResourceConfig": {"avalancheNodeConfig": {}},
  "created": "2024-04-04T15:15:10.022849",
  "cloudRegionsIds": {},
  "resourcesIds": {}
}